%20(1).png)
Tech Pack for Clothing Manufacturing: Step-by-Step Guide

A sketch can show what you want to make, but it can’t tell a factory exactly how to make it. If you’re unsure which measurements, materials, construction details, and finishing instructions to include, you’re not alone. Creating a tech pack for clothing manufacturing turns your design into clear, measurable instructions, helping reduce misunderstandings that can lead to incorrect samples and avoidable revisions.
A tech pack works best as a living production document, not a one-time design sheet. As a garment develops, you and your manufacturer can clarify open specifications, update details, and keep everyone working from the same version. Clear documentation also connects pattern making, material sourcing, sample development, and quality control.
This guide explains what to include in a clothing tech pack and how to organize each specification, from technical sketches and measurements to materials and construction notes. You’ll learn how to prepare a practical handoff, review samples against your instructions, and record decisions as the design takes shape.
Table of Contents
Why a Clothing Manufacturing Tech Pack Matters Before Sampling
A design can communicate mood and silhouette without telling a production team how to build the garment. A drawing might show a shaped neckline, for example, but leave the neckline finish, measurements, and material unspecified. Those gaps require interpretation. If the designer and manufacturer interpret them differently, the first sample may reveal questions that clearer documentation could have addressed earlier.
A clothing tech pack is an organized specification that communicates the design and production requirements for one garment style. It gives design and manufacturing teams a shared reference for developing a sample, planning production, and checking whether the garment matches the agreed details.
Think of it as a working document, not a frozen handoff. During sample development, questions may come up about an open choice or a detail that needs refinement. Record each agreed decision in the pack so the updated direction is clear for pattern making, material sourcing, and later quality checks.
What does a garment tech pack do?
A tech pack brings key instructions together, including the design, materials, measurements, and construction details. It turns visual intent into information a production team can interpret and act on. Technical design and tech packs are discussed within the broader manufacturing context in Advanced Fashion Design and Technology.
A mood board or inspiration image helps communicate the look and feel you want. It doesn’t usually explain how a garment should be assembled or which measurable details define the sample. The tech pack records those decisions, giving everyone the same specifications to follow instead of relying on memory or assumptions.
That clarity supports more than sample making. Production planning can use the documented requirements to understand what the style calls for, while quality checks can compare the garment with the intended specifications. The pack connects these stages, but it can only guide decisions on details it actually records.
When should a brand create a tech pack?
Start creating a tech pack for clothing manufacturing once the concept has enough detail to describe the intended garment. You don’t need every decision settled before starting. Document what’s known, then mark unresolved choices clearly so they can be discussed during development instead of silently filled in.
Update the document when sample review leads to a change. If a construction choice or material detail is revised, record the decision and update the working version. This gives the manufacturer a clear reference for the next development step.
Give every garment style its own clearly identified specification. Similar styles may share elements, but a separate pack helps prevent details from one design being mistaken for another. A clear style name or identifier, paired with a current document version, helps everyone follow the right instructions.
What to Include in a Clothing Tech Pack for Manufacturing
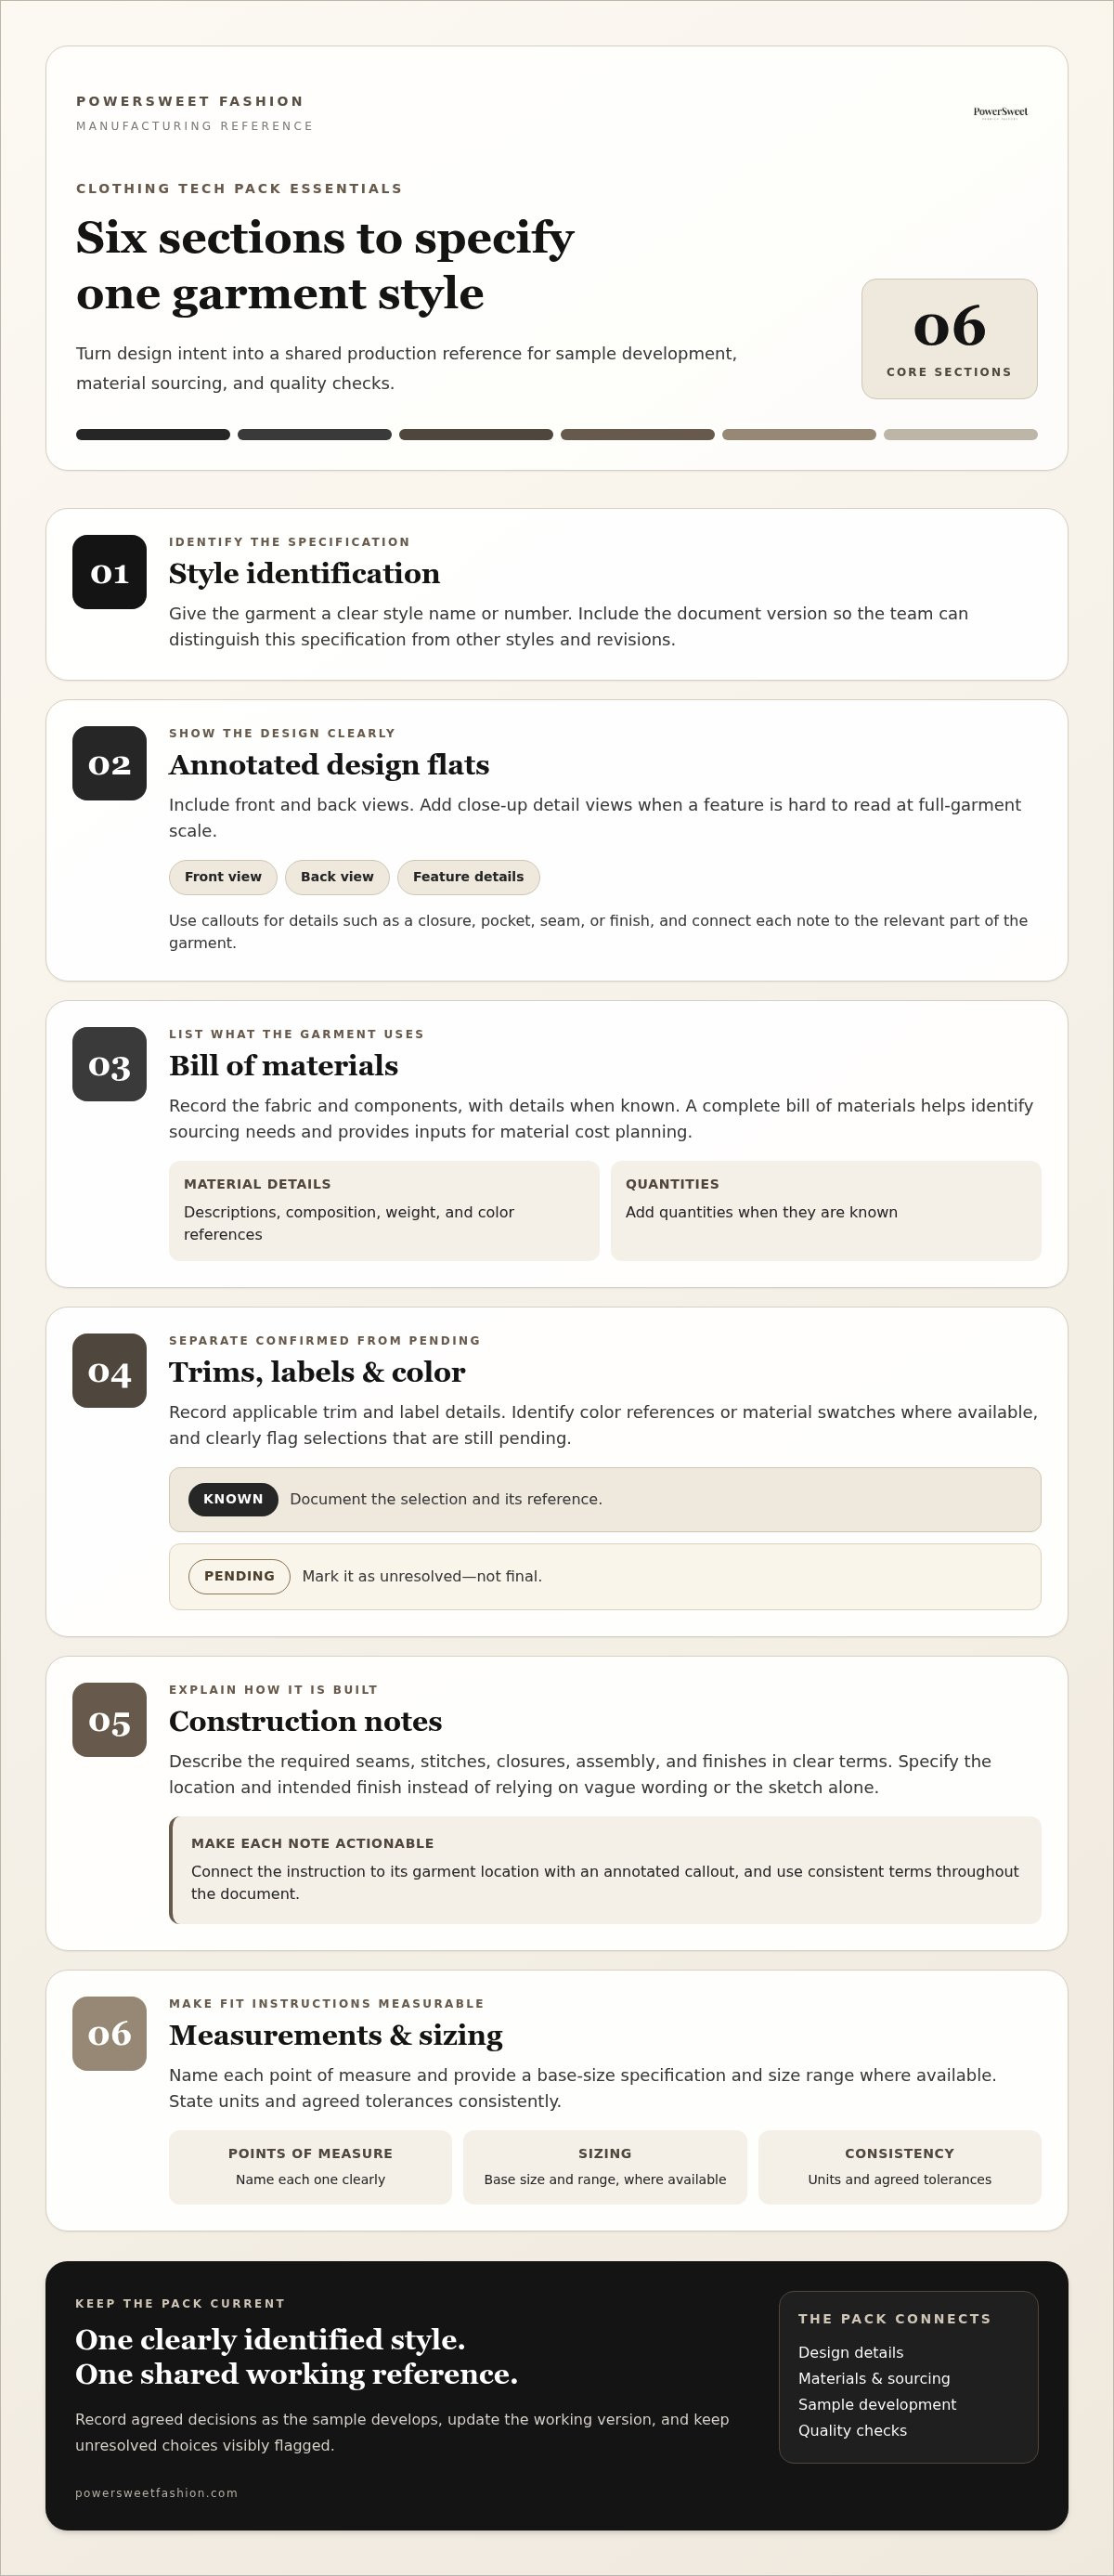
Build the pack so a production team can find each instruction quickly and connect it to the garment. Requirements vary by style: a simple design may need fewer construction notes than one with multiple panels, closures, or special finishes. Separate confirmed specifications from open decisions, and keep the document focused on one clearly identified garment.
Use this checklist as a starting point, then tailor it to the design:
Style identification: Add the style name or number, date, and document version so the team can distinguish this specification from other garments and revisions.
Design flats: Include annotated front and back views. Add detail views for features that aren’t clear at the full-garment scale, such as a closure, pocket, seam, or finish.
Bill of materials (BOM): List the garment’s fabric and components, with descriptions, composition, weight, color references, and quantities when known. A complete BOM helps identify materials for sourcing and provides inputs for material cost planning.
Trims, labels, and color: Record applicable trims and label details, and identify color references or material swatches where available. Mark selections that are still pending rather than presenting them as final.
Construction notes: Describe the required seams, stitches, closures, assembly, and finishes in clear terms. Use annotated callouts to connect each instruction to the relevant part of the garment.
Measurements and sizing: Name points of measure, provide a base-size specification and size range where available, and state units and agreed tolerances consistently.
Design, materials, color, and construction details
Make each annotation specific enough to guide a production decision. Instead of writing “neat finish,” identify the location and intended finish. Mark where a seam or closure belongs on the flat, and add a close-up when its placement or appearance could be misread. Keep callouts legible and use the same terms throughout the document.
For materials, record what’s known and identify unresolved selections. A fabric description can include its composition, weight, and color reference; list trims and labels when they apply. Construction notes should describe how garment sections join and what finish is expected, rather than relying on a sketch alone to explain the build.
Measurements, size range, and points of measure
Measurements need a clear method, not just a list of numbers. Name each point of measure and indicate where it is taken on the garment, using a diagram or labeled flat when helpful. Include the units beside the specification, then use those units consistently throughout the document.
Identify the base size and include the intended size range when available. If tolerances apply, document the agreed values for the style rather than assuming one rule works for every garment. Clear measurement definitions help the team compare a sample with the specification and make feedback more actionable.
A well-organized pack also gives pattern making, fabric sourcing, and sample development a shared reference. PowerSweet Fashion provides sample development for women’s clothing, helping translate documented design details into a sample.
Tech Pack vs. Sketch, Template, and Sample: What Each One Can Tell You
These tools support different decisions. A sketch can show the intended look, a template can organize information, and a sample can reveal how the design works in fabric. None alone communicates every instruction needed to develop and make a garment consistently. Use each for its purpose, with the tech pack connecting design intent to documented specifications.
Can a sketch or reference image replace a tech pack?
No. Images are useful for showing visual intent, but an image may not reveal where a seam begins, how a closure is finished, or what measurement defines the fit. Add arrows, labels, and close-up views to make important details actionable. Match the drawing’s complexity to the garment: include enough views to explain its construction without adding detail that doesn’t clarify the style.
A sketch can start the conversation. The specification records the decisions the image leaves open, giving pattern making and sample development written details to work from.
How to adapt a template to your garment
A downloadable template is only a framework. It becomes useful for production when you replace generic examples with the garment’s confirmed details and remove fields that don’t apply. Choose sections according to the style’s construction, materials, and functional features. For example, a design with a distinctive closure needs clear closure instructions; an irrelevant field shouldn’t distract from the specifications that matter.
During sample development and pattern making, treat the sample as a test of the documented design. If review reveals a needed change, record it in the tech pack and identify the current version. The approved sample then provides a physical reference, while the updated pack communicates the details behind it. Creating a tech pack for clothing manufacturing means documenting decisions, not relying on a template or sample to speak for itself.
How to Create a Clothing Tech Pack Step by Step
Creating a tech pack for clothing manufacturing works best as a clear, consistent, and traceable process. Identify the garment, record production decisions, and make the current version easy to find. Use this workflow to build the document, review it with your manufacturer, and carry sample feedback into the next revision.
Build the first production-ready draft
Start with the style’s identity and design intent, then add the instructions needed to develop it. Treat the first draft as a working document: put confirmed details in the specification and visibly mark undecided items for discussion.
Define the style. Assign a clear style name or identifier and describe the intended garment category and design. Include enough information to distinguish it from other styles in your range.
Show the design. Add annotated flats that explain the garment’s key features. Use callouts to identify construction details and locations that might otherwise be open to interpretation.
Document materials and components. Record known fabrics, trims, labels, and color references. Mark pending selections as open rather than filling them with assumptions.
Specify measurements and construction. Provide measurement points, units, and available size specifications. Describe the construction requirements in direct language and connect notes to the relevant part of the garment.
Check the draft for consistency. Compare written instructions with visual callouts and measurement tables. If a note describes a different detail from the drawing, resolve the mismatch before handoff.
Review, version, and hand off the pack
Before sharing the draft, add a revision date and indicate which specifications are approved, under review, or still open. Send one clearly identified version as the working reference. When decisions change, update the document and record what changed so the production team doesn’t have to reconcile conflicting notes from separate messages.
Review open questions together. During handoff, discuss unresolved choices with the manufacturer. Record the agreed decision in the relevant section of the tech pack, including the revision that captures it.
Capture sample feedback precisely. Tie each comment to a garment location, measurement, or specification. Replace vague feedback such as “adjust the fit” with a clear note about what needs review, then document the agreed change.
Issue the next revision. Update the revision date and approval status, and make the latest version easy to identify. Keep older versions for reference, but mark them as superseded so they aren’t mistaken for current instructions.
This process gives pattern making, material sourcing, sample development, and quality checks a shared record as the design evolves. For a broader view of how those stages connect, explore this guide to end-to-end clothing production.
PowerSweet Fashion offers sample development to help move documented specifications toward a physical sample.
Turn Your Tech Pack into a Clear Sample and Production Handoff
A tech pack becomes useful when it guides work on the garment, not just when it’s complete on screen. A manufacturer can use its specifications to develop patterns, identify and source materials, and make a sample for review. Each step may raise a question the document can’t answer yet. Treat those questions as part of development, then record agreed decisions so the instructions keep pace with the physical sample.
At PowerSweet Fashion, sample development connects pattern making and material sourcing. Clear documentation helps keep those activities aligned: the pattern reflects the intended design, selected materials support the garment requirements, and the sample gives both teams something concrete to assess. The pack is a shared reference, while discussion helps resolve details that need refinement.
Use sample feedback to refine the specification
Review the sample against the relevant points in the tech pack, including measurements, construction notes, materials, and visual references. Be specific about what you observe and where. For instance, identify the garment area or measurement that needs attention instead of sending a general comment such as “the shape feels off.” That gives the manufacturer a clear starting point for discussing the next step.
Use a simple question-and-resolution loop:
Identify the gap: Point to the location, measurement, or instruction that needs review.
Discuss the options: Share what you intended and work through the production implications together.
Record the decision: Update the specification with the agreed instruction and distinguish it from questions that remain open.
Review the revision: Make sure the next sample is assessed against the current documented direction.
This process turns feedback into traceable instructions. It also avoids confusing a proposed change with an approved one. Link the revision to the relevant detail so the production team can tell what changed and why.
Prepare a handoff that supports production quality
Once a sample is approved, align the tech pack with that sample and the final production specification. Check that the latest measurements, construction details, and material decisions are recorded, and identify the approved version clearly. The sample provides a physical reference; the pack preserves the written requirements teams need to assess garments consistently.
Documented checkpoints give quality control a practical basis for comparison. A reviewer can check the garment against the agreed specifications, flag differences, and communicate findings against a shared reference. This doesn’t remove the need for clear collaboration. It gives the team a consistent way to assess whether a garment matches the approved direction.
Creating a tech pack for clothing manufacturing is an ongoing handoff from design through sample review and production. For broader context on choosing a production partner, explore this guide to choosing a custom women’s clothing manufacturer. PowerSweet Fashion provides custom women’s clothing production, sample development, pattern making, fabric sourcing, and quality control.
Move Your Design Toward Its First Sample
Your next step doesn’t need to be a perfect document. It needs to be a useful starting point: one clearly identified style, the decisions you’ve made, and open questions to resolve with your manufacturing partner. That gives the design a practical route from concept to physical sample, where you can assess how the details work together and decide what to refine.
Approach creating a tech pack for clothing manufacturing as part of building a working relationship, not just preparing a file to send. PowerSweet Fashion supports custom women’s clothing development through connected production stages, from sample development to quality control and bulk production. Clear specifications help turn design decisions into a shared direction for the garment’s next stage.
Discuss your clothing sample development with PowerSweet Fashion and take the next step toward bringing your design into production.
Frequently Asked Questions
What is a tech pack for clothing manufacturing?
A clothing manufacturing tech pack is a style-specific document that tells a production team how a garment is intended to be made. Creating a tech pack for clothing manufacturing means translating design choices into instructions the team can reference, rather than relying on a sketch or verbal explanation. For example, a note can clarify whether a pocket is functional or decorative. The pack supports a shared understanding, while sample review tests how the design works in fabric.
What should be included in a clothing tech pack?
Include the information a manufacturer needs to interpret and develop the particular style. A useful pack identifies the garment, shows its design, describes materials and construction, and records measurements and size information. Add details such as a label position or closure type when they affect the design. Keep terms consistent across pages. If a fabric choice or construction decision is pending, label it as unresolved so it won’t be mistaken for an approved instruction.
Can I make a clothing tech pack without a fashion design degree?
Yes, you can prepare a useful first draft without a fashion design degree. Start by gathering reference images and writing down what you know about the garment, then use a structured format to organize the details. Don’t guess at technical choices you’re unsure about. Flag them for discussion during development. Pattern making and sample development can help translate the documented concept into a garment and identify details to refine.
Is a tech pack the same as a sewing pattern?
No. A tech pack describes what the garment should be like, while a sewing pattern provides the shaped pieces used to cut fabric and assemble it. For example, a specification may describe a garment’s intended dimensions and design details, while the pattern shows the pieces that form its structure. Pattern making uses the design requirements to create those pieces. If a sample leads to an adjustment, record the approved change in the tech pack and update related pattern work.
How detailed should a clothing tech pack be?
Include enough detail for someone who wasn’t part of the design conversation to understand the garment’s intended features. The right level depends on what could be misinterpreted. A simple silhouette may need straightforward views, while a garment with layered panels or unusual closures may benefit from extra callouts. Review each page by asking whether a production teammate could find the instruction and understand it without having to infer what you meant.
What happens if a tech pack changes after a sample is made?
Update the document whenever an agreed change affects the garment, and make the new revision easy to distinguish from the one used for the sample. For example, if a review results in a revised pocket position, note the affected area and update the relevant visual or measurement reference. Keep feedback that’s still under discussion separate from confirmed changes. This helps the team trace which instructions informed each sample and which version guides the next stage.
Do I need a separate tech pack for every clothing style?
Yes, give each style a distinct specification, even if two garments share some components. A separate pack helps prevent a measurement, material choice, or construction note from being applied to the wrong design. You can reuse relevant information as a starting point, but check it against the new garment and document any differences. Identify each pack with its style name or code so it’s easy to locate during review and production planning.


Comments