%20(1).png)
Clothing Sample Development Process: From Design Brief to Approved Sample in 2026

A clear clothing sample development process turns a design brief into a garment the team can assess, revise, and approve before production planning. Without shared instructions for design, pattern making, materials, and sampling, fit or construction problems can surface late, and revision notes can become scattered across emails and files.
Start with clear handoffs and specific approval criteria. Each sample should answer defined questions, from whether the design intent is understood to whether fit, materials, and construction are ready for the next stage. Precise, consolidated feedback helps the development team focus revisions and keep decisions tied to the latest specifications.
This guide follows the stages from design brief and pattern development through material selection, sample review, revision, and approval. You’ll find practical steps for preparing the brief, inspecting a sample, and writing actionable comments. Use them to move from an initial concept to an approved garment sample with fewer avoidable misunderstandings.
Table of Contents
What the Clothing Sample Development Process Is Designed to Prove
How the Clothing Sample Development Process Moves from Brief to First Sample
How to Review a Clothing Sample and Give Useful Revision Feedback
How to Keep Sample Development Timely and Reduce Avoidable Revisions
Move from Approved Clothing Sample to a Clear Production Handoff
What the Clothing Sample Development Process Is Designed to Prove
A design file communicates intent, but it can’t show exactly how a garment will hang, feel, or move when worn. The clothing sample development process turns the design specification into a physical garment the brand and development team can evaluate before making production decisions. It gives the team a practical way to check whether the instructions have been interpreted as intended.
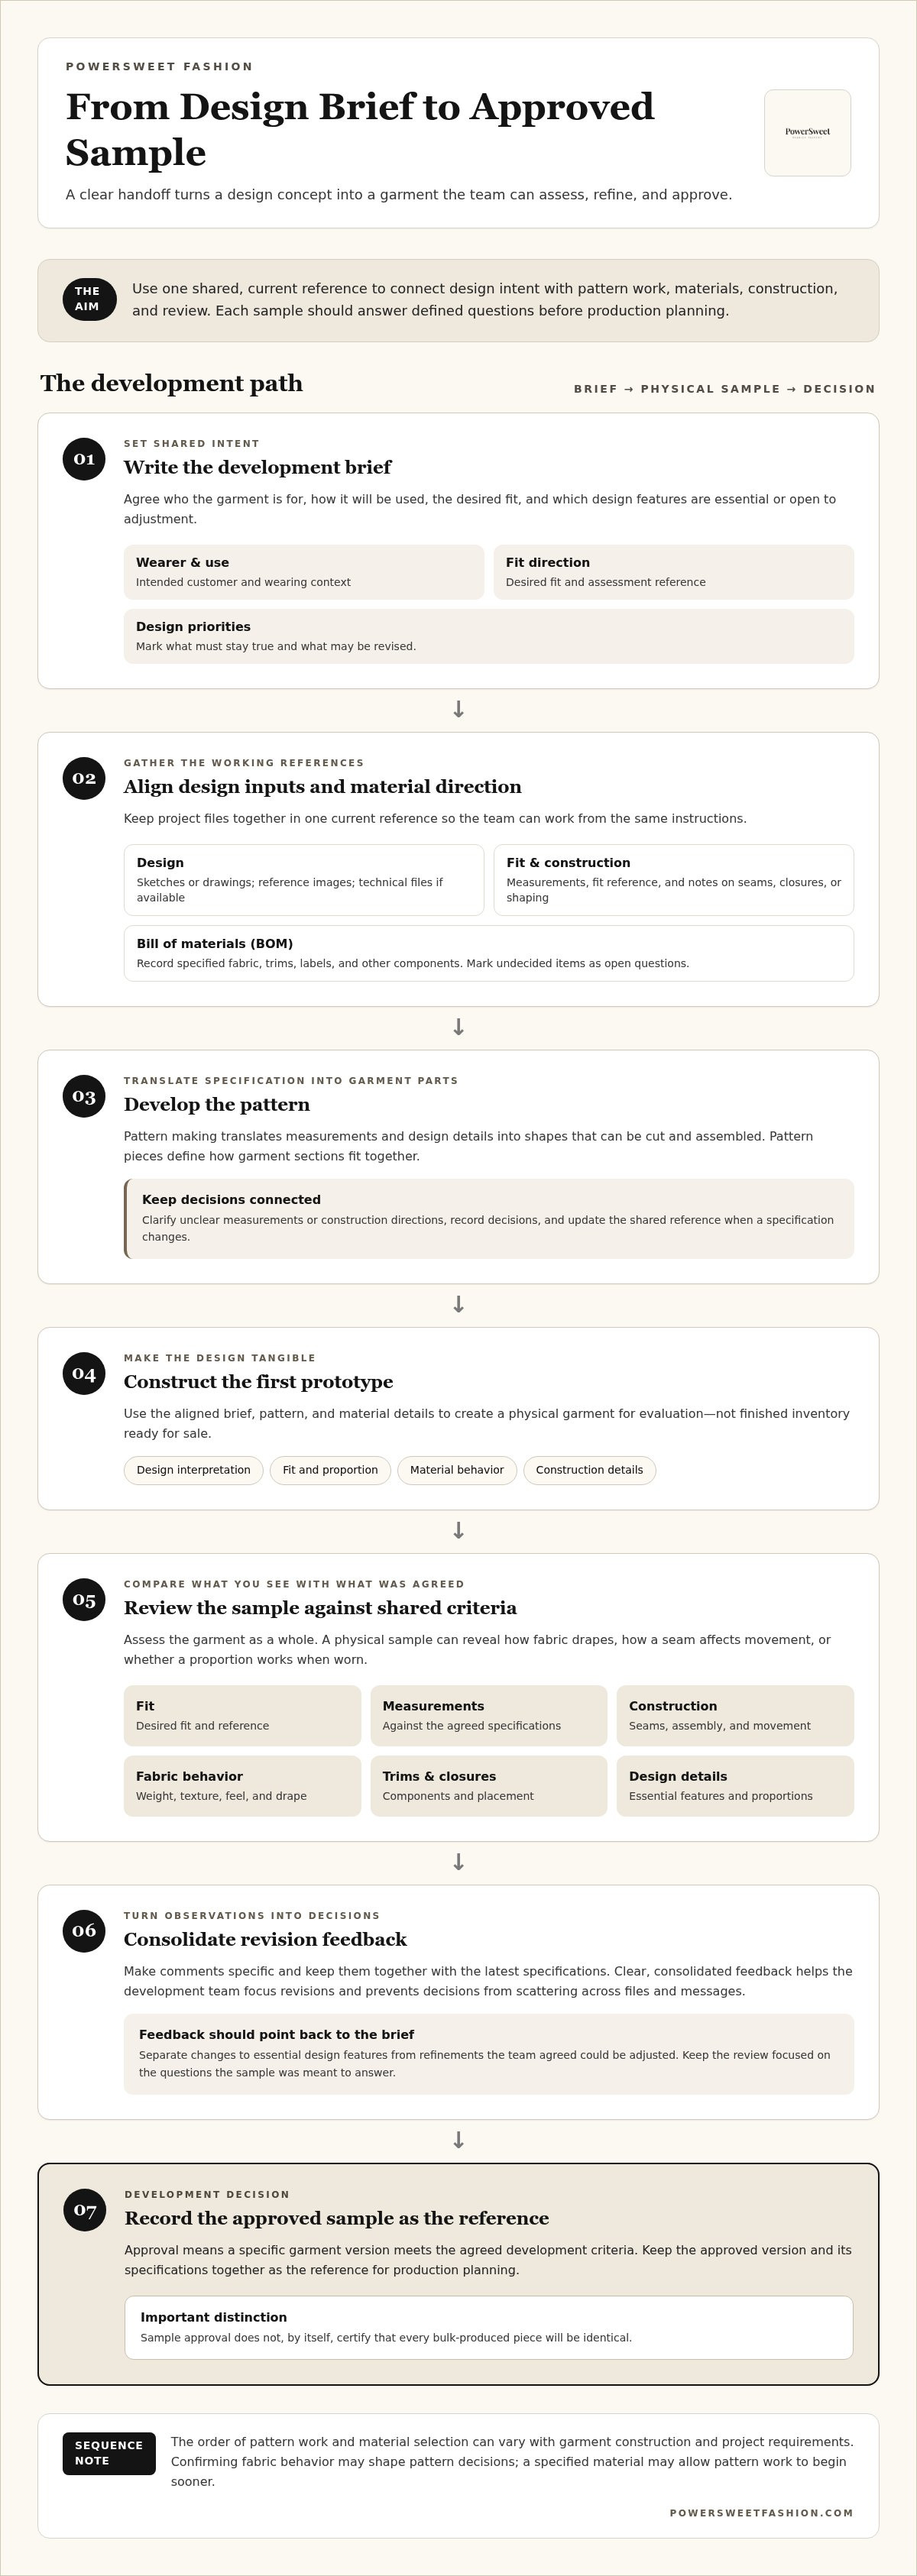
Sample approval establishes that a specific garment version meets the agreed development criteria; it does not, by itself, certify that every bulk-produced piece will be identical. A development sample is a tool for evaluating and refining a design, not finished inventory ready for sale. It helps expose open questions and gives the next stage a clearer reference.
What a clothing sample can reveal
A sketch or digital file can suggest proportion and construction, but a physical garment makes their effects tangible. The fabric may drape differently than expected, a seam may affect sleeve movement, or a proportion that looks balanced on screen may feel wrong when worn. Reviewing the sample lets the team assess these interactions together instead of judging each design element in isolation.
The garment can also reveal gaps in the brief. A measurement may be unclear, a construction instruction may leave room for interpretation, or the chosen material may not support the intended shape. Sewing patterns translate design and measurements into garment components. Sewing patterns in clothing manufacturing help explain how those pieces guide sample construction. Reviewing the finished sample helps identify which specification needs clarification.
Set the goal before development begins
Before work starts, agree on who the garment is for, how it will be used, and what fit direction it should follow. Identify which features must stay true to the design and which can be adjusted. These decisions give reviewers a consistent basis for weighing feedback. A change to an essential detail needs a different discussion from a refinement everyone has agreed is flexible.
Intended customer: Describe the wearer the design is built for.
Use: Explain the garment’s intended purpose and wearing context.
Fit direction: State the desired fit and the reference the team will use to assess it.
Design priorities: Mark essential features and identify details open to revision.
Put these decisions in one shared written brief alongside the design references and relevant specifications. A single current reference reduces conflicting interpretations across design, pattern making, and material sourcing. It also gives the team a concrete basis for sample feedback: compare what you see with what everyone agreed to test.
Keep the goal focused. A sample review should resolve defined questions, not become an open-ended redesign. When the team knows what the garment needs to prove, it can assess the physical sample against shared criteria and carry clearer decisions into the next stage.
How the Clothing Sample Development Process Moves from Brief to First Sample
A clear handoff turns a design concept into work a development team can act on. The clothing sample development process generally moves from design inputs to pattern making, material selection, sample construction, and review. The order can vary with garment construction and project requirements. For example, confirming how a fabric behaves may shape pattern decisions, while a project with a specified material may begin pattern work sooner.
A factory can interpret a design more consistently when it receives aligned sketches, measurements, construction notes, material details, and clear decisions about what remains open. These inputs connect the designer’s intent with the practical work of making a prototype. The U.S. Bureau of Labor Statistics describes the role of fashion designers in sample development, including sketching designs, selecting fabrics, and working with prototypes.
Prepare the design inputs and material direction
Gather the available files and organize them in one current project reference. Useful inputs include:
Sketches or design drawings that show the garment’s shape and key details.
Measurements and fit information, with the intended reference clearly identified.
Construction notes describing seams, closures, shaping, or other important details.
Reference images that clarify visual intent, alongside technical files if available.
A bill of materials (BOM) listing specified fabric, trims, labels, and other components.
Material choices affect more than appearance. Fabric weight, texture, and drape influence how a garment feels and how it can be constructed. Trims and closures can affect placement and assembly, too. Record confirmed choices in the BOM, and mark undecided items as open questions rather than leaving them buried in informal comments. Keeping material and design decisions in one reference helps the team work from the same direction.
Translate the design into a pattern and first prototype
Pattern making translates measurements and design details into shapes that can be cut and assembled. Pattern pieces define how garment sections fit together, so unclear measurements or construction directions can affect the result. As questions arise, record the decisions and update the project reference whenever a specification changes.
The first prototype tests interpretation, proportion, and construction. During review, ask: Does the sample reflect the intended silhouette? Do the garment sections sit and move as expected? Are key details positioned and assembled according to the brief? Does the selected material support the intended look and feel? These questions help distinguish a pattern adjustment from a material or construction issue, giving each revision a clear purpose.
Because construction needs differ by project, treat the workflow as a sequence of checkpoints rather than a fixed recipe. Coordinated sample development and pattern making can connect the brief, material decisions, and first physical prototype.
How to Review a Clothing Sample and Give Useful Revision Feedback
A useful review turns a first impression into decisions the development team can act on. Assess the garment against the agreed specification and fit reference rather than relying on memory or general comments such as “it feels off.” The clothing sample development process moves more efficiently when observations are specific, prioritized, and tied to a result.
Check fit, measurements, and construction systematically
Start with the garment on the intended fit model or against the agreed measurement reference. Check the sample under consistent conditions, and note how it sits and moves when worn. Compare key garment measurements with the specification, recording the actual measurement, the target, and the exact point of measurement. A difference is useful only when the team knows where and how it was measured.
Next, inspect construction and materials together. Check seams, closures, hems, lining, and other details relevant to the design. Observe whether the fabric drapes as intended and whether its weight or behavior affects movement in the garment’s intended use. Review trims and design details for placement, appearance, and function. A visual check on a table may not show how the garment wears.
Fit and proportion: Identify the area and describe what you see, such as excess fabric at the waist or a sleeve that restricts movement.
Measurements: Record the specification, measured result, and exact point of measurement.
Construction: Note the component and issue, such as an uneven hem or a closure that doesn’t lie flat.
Fabric and trims: Describe how they behave or appear in use, not just whether you like them.
Design details: Check placement and execution against the relevant reference.
Turn review comments into a controlled revision list
Separate what you observe from what you want changed. “The shoulder seam sits behind the intended position” is an observation. “Adjust the shoulder position to align with the marked reference” is a requested action. This distinction tells the team both what is wrong and what result you expect, without leaving it to guess.
Every revision note should identify the garment location, the issue observed, and the desired result. Add an annotated photo when it clarifies the location, and link the note to the relevant measurement, design reference, or construction instruction. For example, mark the left side seam in a photo, describe the issue, and state how the finished seam should sit.
Assign each change a priority, such as essential for fit, required for construction, or a lower-priority refinement. Keep comments in one dated revision list tied to the sample version reviewed. When the next sample arrives, compare it against the previous notes and mark each item as resolved, still open, or changed. This record keeps decisions traceable and prevents old comments from being mistaken for current instructions.
How to Keep Sample Development Timely and Reduce Avoidable Revisions
Sample progress depends on more than how quickly a garment can be made. Unclear ownership, conflicting comments, and decisions that change after work begins can send pattern, material, or construction tasks back for review. A well-managed clothing sample development process keeps decisions visible and gives each person a clear reference, without assuming every project follows the same schedule.
Late changes can affect related work. Changing a neckline may require a pattern adjustment and affect how a facing is constructed. Switching fabric can alter the garment’s drape and prompt new fit or seam decisions. Before requesting a change, identify what it affects and whether related work should pause until the new direction is agreed.
Set review ownership and decision points
Choose one person to gather internal comments and send the final consolidated response for each review. Design, merchandising, and other stakeholders can still contribute, but the development team receives one coordinated set of instructions instead of separate, potentially conflicting messages.
Agree which decisions must be approved before the next task proceeds. A material choice, key measurement, or construction detail may need to be settled before related sample work can continue. Keep unresolved questions separate from approved specifications, and assign an owner to each open item. This prevents unanswered questions from becoming assumptions in the next version.
Approved: The current decision is agreed and can guide development.
Open: More information or a decision is needed before proceeding with affected work.
Changed: A previous decision has been replaced, with the update recorded in the change log.
Set a review checkpoint for each sample handoff. The person coordinating the review can confirm that comments are consolidated, questions are assigned, and specifications reflect the latest decisions before work moves forward.
Manage changes without losing the approved direction
Record each design change as a dated entry. Include the reason, garment location, previous instruction, new direction, and affected specification. Flag whether it may affect fit, materials, construction, or details that were already approved. A fabric change, for example, could affect more than the BOM; it may also require the team to revisit the garment’s appearance or construction approach.
Version current files clearly so everyone can identify the latest approved reference. Archive superseded sketches, specifications, and comment documents rather than deleting them. They can explain how a decision evolved, but shouldn’t be mistaken for current instructions. When a change replaces an earlier approval, record that supersession explicitly.
These controls make revision decisions easier to follow across design and development. PowerSweet Fashion provides sample development, pattern making, and material sourcing as part of custom women’s clothing development.
Move from Approved Clothing Sample to a Clear Production Handoff
Approval is a handoff, not just a final comment on a garment. It tells the development and production teams which sample version represents the agreed direction and which specifications should guide production planning. In the clothing sample development process, that reference must be clear enough that teams aren’t left interpreting decisions from memory or searching through outdated files.
Before approving a sample, close or explicitly document outstanding changes. An open question about a key measurement, fabric, or construction detail can lead to different interpretations. If a change is still under discussion, mark it unresolved rather than allowing the sample to appear fully approved.
Document the approved sample and production references
Create a handoff record that identifies the approved sample version and connects it to the current specifications. The goal is traceability: anyone planning production should be able to identify the agreed garment, files, and decisions. Organize the record so the production team can find the current information without relying on an old email thread.
Sample identification: Record the approved version and approval date.
Measurements: Include the specifications and measurement reference used for review.
Construction: Capture the agreed construction details and any relevant notes.
Materials: Identify the approved fabric, trims, labels, and other components.
Design files: Make the current artwork and other relevant files easy to identify.
Keep superseded references separate from current ones. A previous measurement sheet or artwork file may explain earlier decisions, but it shouldn’t be mistaken for the production reference. If a detail changed during development, ensure the approved record reflects the final decision and points to the correct specification.
Coordinate development through a manufacturing partner
A connected workflow can make the transition from development to production planning clearer. When sample development, pattern making, fabric sourcing, and quality-control support work together, the design, pattern, material, and construction decisions have a shared path forward. The approved sample remains a reference, while the production plan carries its documented specifications into the next stage.
Approval doesn’t replace quality control during bulk production. The approved sample and specifications provide comparison references, but production still needs its own checks to identify whether garments align with the agreed requirements. Record and address differences through the project’s quality process rather than assuming sample approval covers them.
PowerSweet Fashion supports custom women’s clothing development with sample development, pattern making, fabric sourcing, quality-control services, and bulk manufacturing. The company’s sample development and production services connect development decisions with production planning. Explore PowerSweet Fashion's sample development and production support for your garment project.
Build a Stronger Starting Point for Your Next Style
An approved sample can do more than move one garment toward production. Treat the decisions behind it as a working standard for future development: a clear record of fit intent, construction choices, and how your team resolves feedback. That shared reference can give your next design brief sharper direction while leaving room for the requirements of each new garment.
The clothing sample development process works best when creative intent and production decisions stay connected. Gather the design files and priorities you’re ready to move forward, and use them to start a focused development discussion.
Explore PowerSweet Fashion's sample development and production support to turn your garment concept into a clear, actionable plan. PowerSweet Fashion offers sample development, with samples ready in 10 days, as well as bulk production in 15-20 days.
Frequently Asked Questions
How many sample rounds does clothing development usually take?
Plan for about two to three sample rounds per style as a practical estimate, not a fixed rule. A simpler garment may need fewer rounds, while substantial fit changes, complex construction, or a material change can add review work. Give each planned round a purpose, such as checking proportions first and confirming key construction decisions later. The clothing sample development process should follow the questions the garment needs to resolve, not an arbitrary round count.
What information should I send for a clothing sample?
Send the clearest available design references and identify the garment’s intended size or fit reference. Include known fabric and trim preferences, artwork files, label details, and construction requirements that affect the design. If a specification is undecided, mark it as provisional and identify who will make the decision. This helps the development team distinguish confirmed instructions from working ideas and focus early discussions on information that could change the sample.
Can a sample be made before I choose the final fabric?
Yes, a sample can be made with a substitute fabric when the final material isn’t selected, but treat it as a limited evaluation. A substitute can help assess silhouette or construction, yet differences in stretch, weight, or drape may change the garment’s fit and appearance. Record the fabric used and keep fabric-dependent judgments open. Before approving details affected by the material, review the garment made with the intended fabric.
What is the difference between a fit sample and a pre-production sample?
A fit sample is generally used to evaluate how a garment fits and whether pattern adjustments are needed. A pre-production sample is usually reviewed later against the intended production materials and construction, so it can serve as a final reference before bulk work. Naming conventions and sample sequences can differ by project. Agree on each sample’s purpose and which decisions it should settle rather than relying on its label alone.
Who owns the pattern after clothing sample development?
Pattern ownership depends on the written agreement between the brand and the pattern maker or manufacturing partner. Before development begins, specify whether the arrangement covers ownership or use, delivery of digital or physical pattern files, grading, and permission to reuse the pattern for future orders. Don’t assume that paying for sample development automatically transfers every pattern right. Clear terms help both sides understand which files and future uses are included.
Does approving a clothing sample guarantee every bulk garment will be identical?
No. Approval establishes a reference for production, but it doesn’t guarantee that every garment will be identical. Fabric variation, sewing operations, and other production factors can create differences. Define acceptable quality criteria and use production checks to compare garments with the approved specifications and sample. For example, quality control can review measurements and workmanship during production, then flag items outside the agreed requirements for corrective action.


Comments