%20(1).png)
Garment Sample Making: The Professional Guide to Prototype Development in 2026
- Powersweet Team

- Aug 8
- 12 min read
A single centimeter of error in your initial prototype can translate into thousands of dollars in wasted inventory once you hit the cutting table for bulk production. In the 2026 market, garment sample making is no longer just a creative milestone; it is the final technical validation that dictates the profitability of your entire collection. You've likely experienced the frustration of sizing inconsistencies or the mounting costs of multiple sampling rounds that still don't quite hit the mark. It's a common industrial hurdle that usually stems from a disconnect between the design studio and the factory floor.
We understand that your brand's reputation relies on precision and speed. This guide will show you how to master the technical process of sampling to ensure your designs transition perfectly from concept to bulk production. We'll explore the impact of the July 2026 CPSC eFiling mandates and California's SB 707 on your development workflow. You'll learn how to leverage in-house pattern making and advanced 3D simulation to eliminate miscommunication with factories. By the end of this article, you'll have a systematic approach to achieve a 10-day sample turnaround while maintaining the meticulous quality your customers expect.
Table of Contents
The Critical Role of Garment Sample Making in Fashion Production
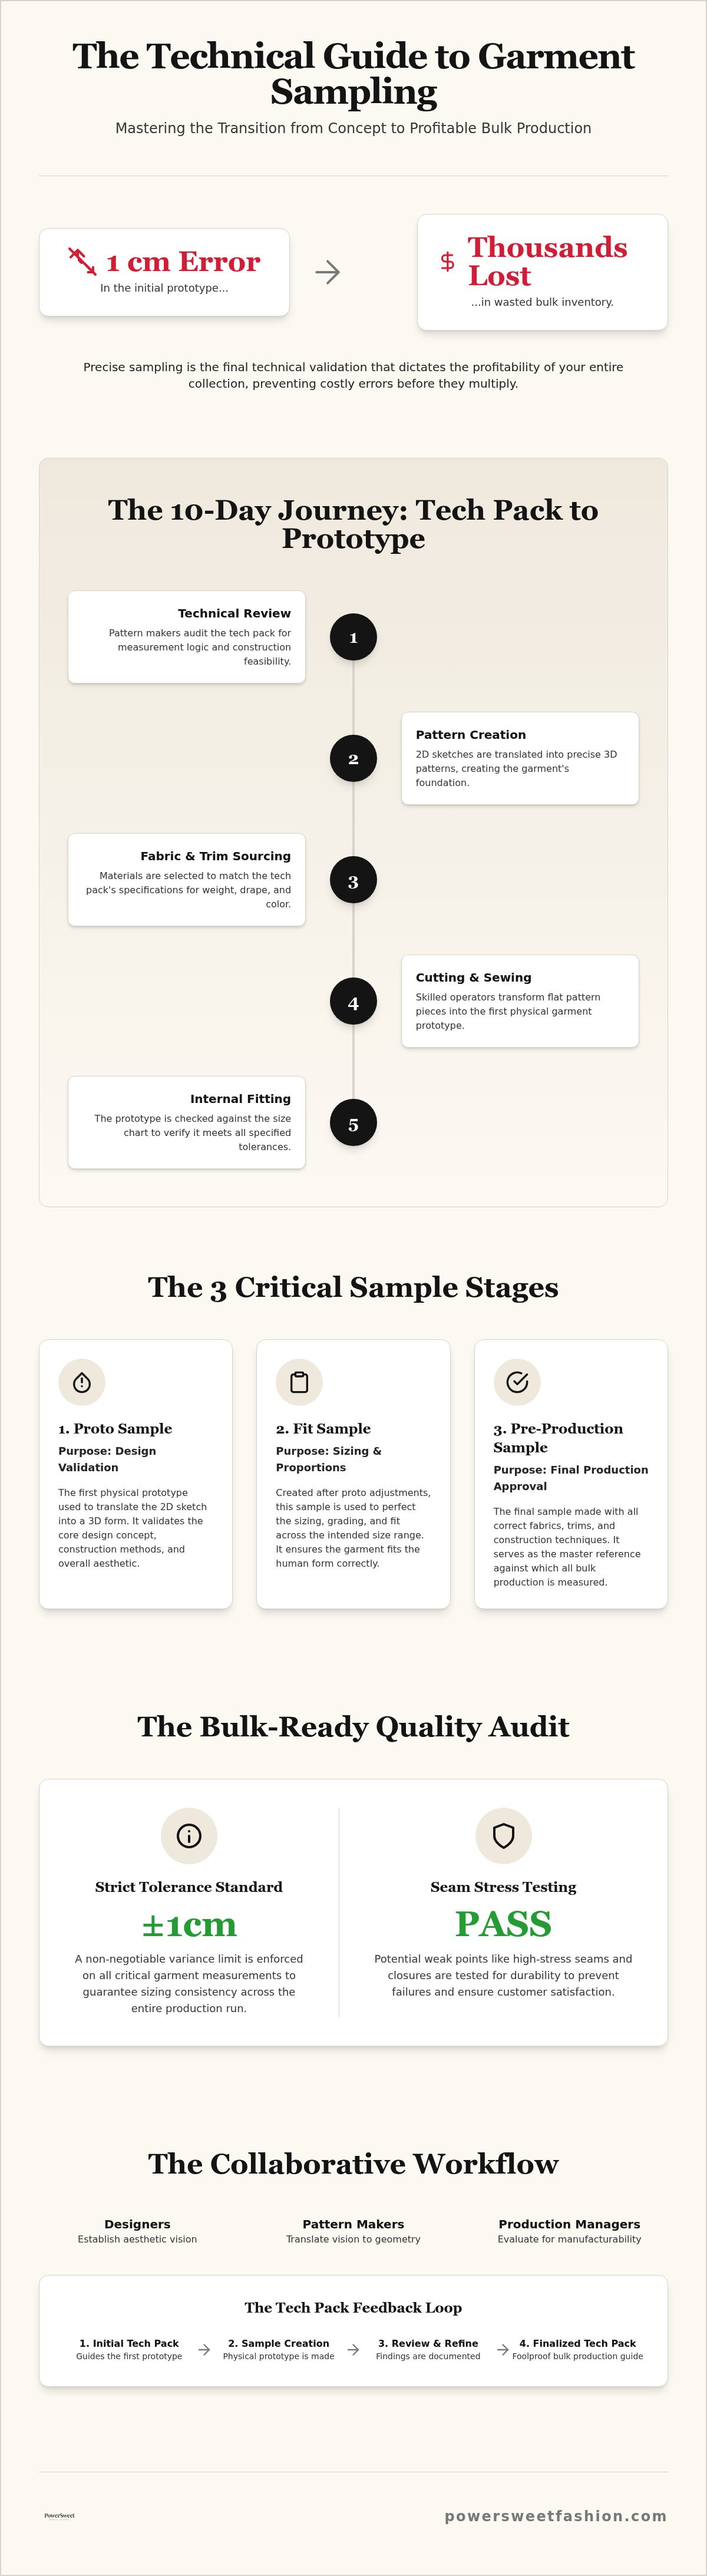
Garment sample making is the process of creating a physical prototype to validate the design, fit, and construction of a piece before it enters the production line. It's the bridge between a digital sketch and a wearable product. While some brands feel pressured to rush toward a launch, skipping the sampling phase is a risk that often leads to expensive bulk production failures. Without a physical prototype, you're essentially guessing how a fabric will behave or how a seam will hold under tension. This stage allows us to catch errors when they cost pennies to fix, rather than thousands of dollars in wasted inventory later.
We view the sample as a technical blueprint. It serves as the master reference for our quality control team, providing a physical standard that the entire production run must match. In a professional manufacturing environment, the process involves a collaborative effort between three primary stakeholders:
Designers: They establish the aesthetic vision and functional goals of the piece.
Technical Pattern Makers: They translate sketches into precise geometry to ensure the garment fits the human form.
Production Managers: They evaluate the prototype for manufacturing speed and cost-effectiveness.
Before the first stitch is sewn, a technical Pattern (sewing) must be drafted. This document translates aesthetic ideas into a series of flat components that dictate how the fabric is cut and assembled.
Why Sampling is Your Best Risk Mitigation Tool
Every fabric behaves differently under the needle. A silk crepe de chine drapes differently than a polyester blend, even if their weights are identical. Sampling allows you to test how the fabric moves and reacts to specific seam types before you commit to purchasing bulk yardage. We use this phase to identify potential weak points, such as high-stress seams or difficult closures, that could lead to customer returns. By solving these mechanical issues in the sample room, you ensure the garment can be mass-produced efficiently without sacrificing durability.
The Connection Between Samples and Tech Packs
The relationship between the sample and the tech pack is cyclical. While the tech pack guides the creation of the first prototype, the findings from that prototype are used to finalize the technical specification sheet. Every adjustment made to a button placement, zipper length, or seam allowance during the fitting is documented. This creates a foolproof record for the factory floor. The tech pack is the instruction manual for the sample maker. Through professional garment sample making, we refine this manual to ensure that every detail is captured for a seamless transition to bulk production.
The Technical Journey: From Tech Pack to Prototype in 10 Days
Transitioning from a digital tech pack to a physical prototype requires a disciplined, multi-stage workflow. We condense this journey into a 10-day cycle to meet the demands of modern fast-fashion brands. This speed is achieved through a structured technical review where our pattern makers audit your tech pack for feasibility. They identify potential construction hurdles, such as pocket placements that might interfere with side seams, before a single inch of fabric is cut. This proactive approach is a core part of professional garment sample making, ensuring the design is viable for mass production from day one.
The process follows five distinct steps:
Step 1: Technical Review - The pattern maker examines the tech pack to ensure all measurements and construction details are logically sound.
Step 2: Pattern Creation - We translate 2D sketches into technical 3D patterns, creating the geometric foundation for the garment.
Step 3: Fabric and Trim Sourcing - Materials are selected to match your design intent, focusing on weight, drape, and color accuracy.
Step 4: Cutting and Sewing - The first physical assembly takes place, where skilled operators transform the pattern pieces into a garment.
Step 5: Internal Fitting - Our team performs a preliminary check against your size chart to verify that the prototype meets the specified tolerances.
For a deeper dive into the technical standards of this process, the Handbook on Garment Sample Development provides an excellent framework for maintaining manufacturing efficiency during these early stages.
Pattern Making: The Foundation of Fit
Modern garment sample making relies heavily on digital CAD pattern making. While traditional paper drafting still has its place, digital systems allow for faster iterations and more precise grading across different size ranges. This technology ensures that the fit remains consistent whether you're producing a size small or an extra-large. As a dedicated sample development clothing manufacturer, we maintain a library of digital blocks to ensure your brand's signature fit stays uniform across every collection.
Integrated Sourcing During the Sampling Phase
Sourcing trims and fabrics often creates the biggest bottleneck in the development cycle. We solve this by integrating sourcing directly into the sampling phase. By utilizing factory-direct sourcing for buttons, labels, and zippers, we save weeks of waiting for third-party deliveries. We match fabric weight and composition to your original vision, often leveraging local supply chains to find deadstock or custom textiles that fit your timeline. If you're looking to streamline your development, partnering with a full-service factory that handles both sourcing and sampling is the most efficient path to market.
Evaluating Sample Types: Prototypes, Fit Samples, and PPS
Garment sample making is not a single event but a progressive series of technical refinements. Each sample type serves a specific function in the production pipeline, moving your design from a creative concept to a shelf-ready product. Understanding these distinctions prevents the common mistake of trying to solve every design and fit issue in a single round. By isolating variables, we ensure that each iteration brings the garment closer to manufacturing perfection.
Proto Sample (1st Sample): This is your first look at the design in three dimensions. We use it to verify the overall silhouette and aesthetic proportions. It is often made with "available" fabric of a similar weight to save costs while the final material is being sourced.
Fit Sample: We focus exclusively on sizing and ergonomics here. This sample is tested on a live model or a standard dress form to ensure the garment sits correctly and allows for comfortable movement.
Pre-Production Sample (PPS): This is the most critical version in the entire cycle. It must be created using the exact bulk-ready fabrics, trims, and labels intended for the final run.
Salesman Sample (SMS): These are high-quality versions produced for marketing, photo shoots, and trade shows. They are essential for securing pre-orders before bulk manufacturing is complete.
Physical vs. Virtual 3D Prototyping
Digital 3D modeling has revolutionized rapid design iterations. You can test dozens of colorways and print placements in minutes without cutting a single yard of fabric. This speed is invaluable for the early stages of collection planning. However, digital samples have a major limitation: you cannot feel the texture or "hand-feel" on a screen. We recommend a hybrid approach to garment sample making. Use 3D simulation for speed and aesthetic alignment, then transition to physical samples for final validation of drape and construction durability.
The Pre-Production Sample (PPS) Checklist
The PPS acts as the final gatekeeper before mass production begins. It is the version that proves the factory can execute your design at scale. When auditing this sample, verify that the thread count and seam types match your technical specifications exactly. Check the placement of care labels and brand tags to ensure they meet regulatory compliance standards. We always enforce the "Golden Sample" rule: once the PPS is approved, one copy is locked away as the master reference. This sample becomes the empirical benchmark for all quality control checks throughout the bulk manufacturing process.
Ensuring Bulk Readiness: How to Audit Your Garment Samples
A flawless prototype is only useful if it can be replicated five hundred times without failure. Auditing is the most critical phase of garment sample making because it uncovers the hidden flaws that lead to mass-market returns. You must treat the sample as a piece of industrial equipment, not just a fashion statement. We recommend starting with a rigorous measurement check against your original spec sheet. A variance of even ±1cm in critical areas like the neck width or armhole depth can ruin the fit of an entire production run. Consistency is the foundation of brand trust.
Durability is equally vital. Perform a manual stress test on every seam and closure to ensure they withstand the rigors of daily wear. Pull the fabric firmly at the seams to check for thread breakage or "grinning" where the stitches become visible. Turn the garment inside out to inspect the hidden construction. Clean overlock stitches and neatly trimmed threads are non-negotiable indicators of a factory's attention to detail. Finally, subject the sample to a standard wash cycle. This validates fabric shrinkage and colorfastness, ensuring the end consumer doesn't experience a garment that loses its shape after one laundry load.
Identifying Production Bottlenecks in the Sample
Efficiency on the sewing line directly impacts your bottom line. During the audit, look for ways to simplify complex construction without sacrificing the aesthetic. Sometimes, a labor-intensive pocket lining or a decorative topstitch can be modified to reduce per-unit costs and speed up delivery. We often suggest alternative trims that are easier to source in high volumes to avoid supply chain delays. It's essential to consult with your custom women's clothing manufacturer during this phase. Their production teams can identify which details will slow down the machines and offer pragmatic solutions that maintain your design integrity.
The Fitting Session: Beyond the Mannequin
Static dress forms are excellent for initial draping, but they don't move. Testing your sample on a live fit model is superior because it reveals how the fabric reacts to the human body in motion. Check for a full range of motion; the wearer must be able to sit, walk, and reach comfortably without the garment pulling or riding up. Document every correction clearly with high-resolution photos and annotated sketches. This documentation ensures the pattern maker understands exactly where the tension points are located. If you're ready to move from concept to a bulk-ready prototype, contact us to begin your sample development and ensure every technical detail is perfected before production.
Bridging the Gap: Moving from Sample Approval to Bulk Manufacturing
Approval is the final hurdle before your vision becomes a commercial reality. Once the pre-production sample is signed off, the technical journey shifts from validation to execution. This is the moment to finalize your tech pack. Every minor adjustment made during the garment sample making process, including seam allowance tweaks or button spacing shifts, must be updated in the digital master file. This ensures the instruction manual for the sewing line is 100 percent accurate before the first bolt of bulk fabric is cut.
Transitioning to end to end clothing production provides the highest level of security for your collection. When the same facility handles pattern making, sourcing, and mass assembly, the risk of miscommunication evaporates. Bulk production typically requires 15 to 20 days after the final sample approval. This timeline accounts for fabric arrival, industrial cutting, and the final quality audit. By keeping the entire process under one roof, we maintain a tight feedback loop between the sample room and the production floor.
The Power of Low MOQ for Scaling Brands
Scalability is about managing cash flow effectively. By setting a strategic Minimum Order Quantity (MOQ) based on your approved prototypes, you can test the market without overextending your capital. The 2026 fashion market favors agility over massive, stagnant inventories. Small batch manufacturing allows you to sample multiple colorways and launch a diverse collection with minimal financial exposure. This flexibility lets you respond to real-time sales data rather than relying on forecasts made months in advance.
Quality Assurance During the Mass Production Phase
Mass production requires a physical benchmark to ensure consistency across hundreds of units. We use the Golden Sample as the empirical standard for every mid-production inspection. Our factory-direct model eliminates the middleman, ensuring that the technicians who developed your sample are the same ones overseeing the bulk machines. This level of transparency lowers the barrier to entry for new brands while providing the stability seasoned professionals require. Ready to see your designs in 10 days? Contact our production team today to begin your development journey.
Master Your Production Pipeline for 2026
Professional garment sample making is the technical bridge between a creative vision and a profitable collection. By mastering the 10-day development cycle and implementing rigorous audits against your tech packs, you eliminate the risk of sizing errors and production delays. The pre-production sample serves as your ultimate benchmark. It's the physical blueprint that ensures every piece in your bulk run meets your brand's high standards. Precision at this stage is what allows your brand to scale with confidence.
Our expert pattern making team and in-house sourcing capabilities are designed to help you move fast without sacrificing meticulous care. We provide the stability of a seasoned veteran with the speed of a modern innovator. Whether you're launching a new line or expanding your existing footprint, our low MOQ production options provide the flexibility you need to stay agile. Your vision is ready for the world. Let's build the physical reality together.
Get Your Custom Samples in 10 Days; Start Your Production Journey with PowerSweet Fashion
Frequently Asked Questions
How long does the garment sample making process usually take?
Our garment sample making process typically takes 10 days once the tech pack and materials are finalized. This timeline includes the technical review, pattern creation, and physical assembly of the prototype. While complex designs with intricate detailing might require a few extra days, our integrated facility allows us to maintain this fast-paced cycle for most women's fashion styles.
How much does it cost to make a custom clothing sample?
The cost of a custom clothing sample depends on the complexity of the design, the fabric choice, and the labor required for construction. Generally, the first sample carries a higher cost because it includes the initial development of the technical pattern and grading. We provide a detailed quote after reviewing your tech pack to ensure full transparency before we begin the development phase.
What do I need to provide to a factory to start the sampling process?
You should provide a comprehensive tech pack that includes detailed sketches, a bill of materials, and a size specification sheet. If you have reference garments for fit or specific construction details, these are also helpful for our pattern makers. Clear documentation reduces the risk of miscommunication and helps us achieve a perfect first prototype on the first attempt.
Can I make changes to my design after the first sample is made?
Yes, making design adjustments after reviewing the first prototype is a standard part of the development cycle. This stage is specifically designed for you to refine the silhouette, pocket placements, or trim choices. We document every change in your tech pack to ensure that the subsequent fit sample or pre-production sample reflects your updated vision for the collection.
What is the difference between a proto sample and a fit sample?
A proto sample is the first iteration used to validate the overall design and silhouette, often using substitute fabrics to save on costs. In contrast, a fit sample focuses entirely on sizing and how the garment sits on a human form. While the proto sample checks the look, the fit sample ensures the ergonomics and range of motion are correct for your audience.
Is it possible to use different fabrics for the sample and bulk production?
You can use a similar "available" fabric for your initial proto sample to save costs during the design phase. However, your pre-production sample must use the exact fabric and thread count intended for bulk manufacturing. This is the only way to accurately test for shrinkage and drape before you commit your capital to a full production run.
How many rounds of sampling are typically required for a new brand?
Most professional brands require two to three rounds of sampling to move from a concept to a bulk-ready product. This typically involves one proto sample for design, one fit sample for sizing, and a final pre-production sample for quality validation. Using an integrated garment sample making service often reduces the number of rounds by catching technical errors early in the process.
What happens if I am not happy with the quality of the sample?
If you aren't satisfied with the sample quality, we conduct a joint review to identify where the prototype deviated from the tech pack. Our pattern makers and production managers will then implement corrections for the next round. Open communication at this stage is vital to ensure the final product meets your brand standards before mass manufacturing begins.


Comments